What is Business Manager?
Business Manager allows advertisers to manage their marketing efforts in one place and share access to assets across their team, partner agencies and vendors.
What can you do with this tool?
Create and manage multiple assets such as a Facebook Page, Instagram account, audience list or product catalogue, all in one place. Control user access and permissions for everyone who works on your ad accounts, Pages and apps, and maintain ownership of all your assets. Track your ads on Facebook and Instagram more efficiently with easy overviews and detailed views of your ad spending and impressions.
Facebook Business Manager is an incredibly useful and powerful tool for advertisers. If you’re running Facebook and/or Instagram ads, it’s the command center of all account connections and activities. There’s no doubt it has streamlined various processes and made it much easier to connect employees and accounts.
You can easily give different people on your team different levels of access to each Facebook Page or Ads Account in your management portfolio. The Pages and Ads Manager and Power Editor all function the same once you access those areas, the Business Manager is just a central hub for managing the accounts.
How to set up Facebook Business Manager
Step 1. Create a Facebook Business Manager account
Whether you’ve already created a Facebook page or you’ve only got a personal Facebook profile, the first stage of setting up Business Manager is to create an account.
1. Go to
business.facebook.com and click the big blue
Create Account button at the top left of the screen.
2. Enter your business name in the pop-up box, then click Continue.
3. Enter your name and the business email address you want to use to manage your Facebook Business Manager account, then click Finish.
Step 2. Add your Facebook business page(s)
In this step, you have a couple of different choices. You can add an existing Facebook business page or create a new one. If you manage Facebook pages for clients or other businesses, you can also request access to someone else’s page.
That last distinction is important. While you can use Business Manager to manage clients’ Facebook pages and ad accounts, it’s important to use the Request Access option rather than the Add Page option. If you add your client’s pages and ad accounts to your Business Manager, they’ll have limited access to their own business assets—a sure way to cause tension in your business relationship.
For the purposes of this post, we’ll assume you’re managing your own assets, rather than acting as an agency, so we won’t get into the Request Access process. But be sure to keep this difference in mind.
To add your Facebook page to Facebook Business Manager:
1. From the Business Manager dashboard, click
Add Page, then, in the pop-up box, click
Add Page again.
2. Start typing the name of your Facebook business page in the text box. Your business page name should autocomplete below, so you can just click on it. Then click Add Page. Assuming you have administrator access to the page you’re trying to add, your request will be approved automatically.
3. If you have more than one Facebook page associated with your business, add the remaining pages by following the same steps.
Step 3. Add your Facebook ad account
Note that once you add your ad account to Facebook Business Manager, you can’t remove it, so it’s especially important only to add accounts you own. To access a client account, click
Request Access instead.
If you’re already using Facebook ads, you can link your existing ad account as follows:
1. From the Business Manager dashboard, click
Add Ad Account, then
Add Ad Account again, and then enter the ad account ID, which you can find in
Ads Manager.
If you don’t already have a Facebook ads account, here’s how to set one up.
1. From the Business Manager dashboard, click Add Ad Account, then Create Account.
2. Enter your account details, then click Create Ad Account.
Each business can create one ad account right from the start. Once you are actively spending money in your first ad account, you can add up to four more—but you cannot host more than five ad accounts within one Business Manager.
Step 4: Add people to help you manage your Facebook assets
Keeping on top of your Facebook marketing can be a big job, and you may not want to do it alone. Facebook Business Manager allows you to add team members so you can have a whole group of people working on your Facebook business page and ad campaigns. Here’s how to set up your team.
1. From your Business Manager dashboard, click the
gear icon (Business Settings) at the top of the page.
2. Click the People and Assets tab, then choose People in the left-hand column. This will bring up a list of all the people who have access to your Facebook Business Manager.
For now, you’ll just see yourself listed, but we’re about to change that. Click
Add to start adding team members.
3. In the pop-up box, enter the business email addresses of team members you want to add. This might include employees, freelance contractors, or business partners, but in this step you are specifically adding individuals, rather than an agency or another business (you can do that in the next step).
You can decide whether to give these individuals limited account access (choose
Employee privileges) or full access (choose
Admin privileges). You can get more specific in the next stage. Make sure to add people using their work email addresses.
When you’re ready, click
Add People.
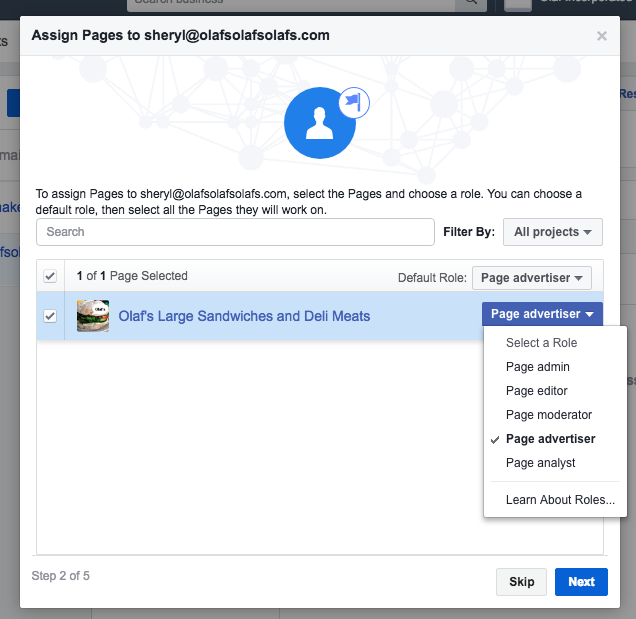
4. Choose which pages you want each of your team members to work on. You can choose to assign each person as a Page admin, Page moderator, Page analyst, Page editor, or Page advertiser. Here’s a quick summary of what each role entails:
- Page admin: Can manage all aspects of the page, including assigning new Page roles to others.
- Page moderator: Can create ads and branded content; send, respond to, and delete messages and comments; and view insights.
- Page analyst: Can manage branded content settings and view insights.
- Page editor: Can do everything a Page moderator can do plus publish as the page.
- Page advertiser: Can do everything a Page analyst can do plus create ads.
The various roles also have different degrees of control over the Instagram account linked to your Facebook page.
Once you’ve assigned the appropriate roles to the right people, click Next.
5. Next, you’ll assign which ad accounts your team members can work on, and what roles they’ll have for each account. As with pages, you have several choices based on the responsibilities and levels of access you want to assign to each member of your team: ad account analyst, ad account admin, or ad account advertiser. Here’s a quick breakdown:
Ad account admin: Can manage all aspects of campaigns, including editing billing details and assigning roles to others.
Ad account analyst: Only has access to view ad performance.
Ad account advertiser: Can see, edit, and create new ads.
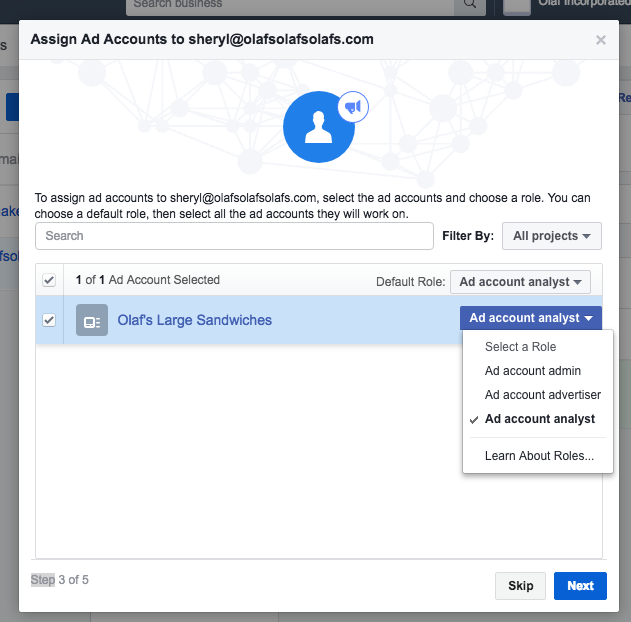
When you’re happy with your assignments, click Next. The next screen will ask about assigning people to catalogs, but you can skip this for now, so click Skip.
You’ll see a notice telling you how many people you have added to your team and what roles you’ve assigned.
6. Now you need to wait for each of the individuals to accept your invitation to be part of your Facebook Business Manager team.
They will each receive an email with information about the access you’ve given them and a link to get started, but it would be a good idea for you to send them a personal note or let them know directly that you’re giving them this access and they should expect the automated email with the link.
You can see all of your pending requests from your dashboard, and withdraw them at any time for people who have not responded.
If someone with access leaves your company or switches to a different role, you can revoke their permissions. Here’s how:
1. From your Business Manager dashboard, click the gear icon (Business settings) at the top right.
2. From the People and Assets tab, click People.
3. Click on the name of the appropriate person, then click Remove.
Step 5: Connect your business partners or ad agency
This might not apply to you if you’re just getting started with Facebook advertising, but you can always come back to this step later.
1. From your Business Manager dashboard, click the gear icon (Business settings) at the top right.
2. Click on the People and Assets tab.
3. Select your Facebook page or ad account, then click Partners in the left column.
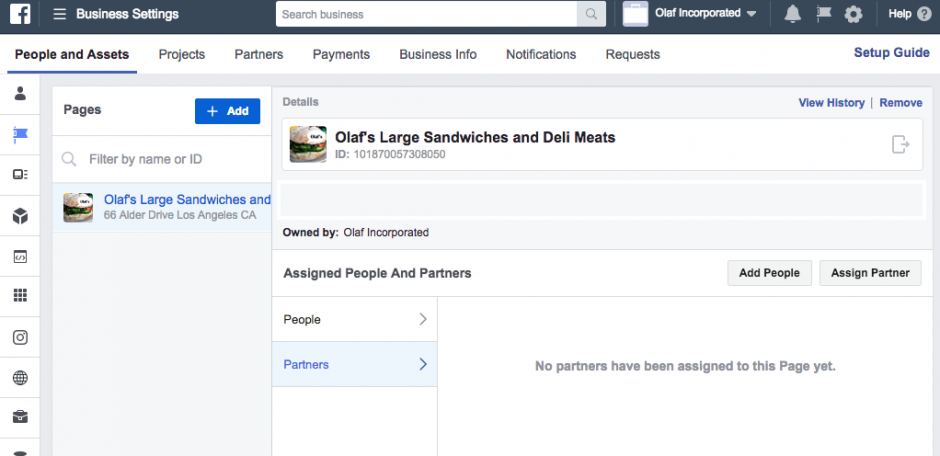
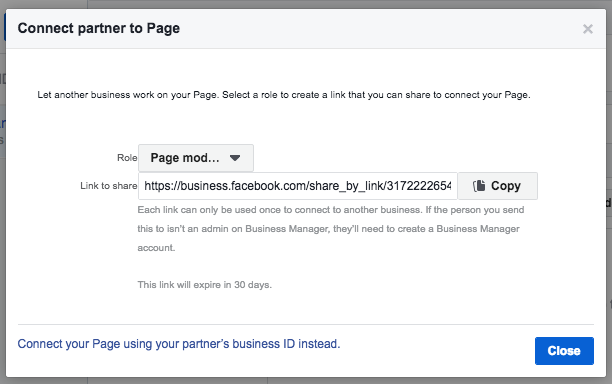
4. Click Assign Partner.
5. Choose the role you want to assign to your partner or agency. The roles are the same as described in Step 4 above.
6. Copy and paste the provided link and send it to your partner or agency to invite them to your Facebook Business Manager, then click Close.
The business you’ve just added can manage permissions for the individuals on their own teams from their own Facebook Business Manager account. That means you don’t need to worry about assigning and managing permissions for all the individual people who service your account at your agency or partner company, just the partner company itself.
The Facebook Business Manager dashboard
Now that you have your Facebook Business Manager up and running, it’s your central dashboard for all marketing and advertising activities within Facebook. This is where you’ll go to update your page, view page and ad insights, start new ad campaigns, and so on.
To get a look at all of the functions you can access through Facebook Business Manager, just click on the Business Manager link in the top left of your dashboard. You’ll see everything broken down into five categories: Plan, Create & Manage, Measure & Report, Assets, and Settings.
